Step-by-Step Guide to Spontaneous Vaginal Delivery: Preparation, Implementation, and Completion
Step-by-Step Guide to Spontaneous Vaginal Delivery: Preparation, Implementation, and Completion.
A comprehensive guide for midwives on performing a safe spontaneous vaginal delivery—covering preparation, indications, contraindications, equipment, active third stage management, and essential newborn care
COMPETENCES
• To conduct the normal delivery
• To be able to interpret the partograph.
To manage the third stage of labor with engagement and attentiveness.
• To help the baby breathe
INDICATIONS
• Term pregnancy
• Vertex presentation
• Frank or complete breach presentation
• Adequate maternal pelvis
CONTRA INDICATIONS:
• Cephalopelvic Disproportion (CPD)
• Malposition and malpresentation
• Complete placenta previa and vasa previa
• Pulsating cord prolapse and cord presentation
PREPARATION
Midwifery
Wear a clean and fitting uniform.
Use closed shoes with a short heel.
Tie back hair and wear a head cap.
Keep nails trimmed and unpainted.
Avoid makeup and jewelry.
Environment (ensure privacy, ventilation, and well-lit).
Infection control (handwashing, waste management).

Client
Introduce the client and request informed consent.
Explain the delivery process to the client and their guest. Listen attentively to their questions and concerns. Respond to their needs.
Respect dignity and the privacy (respectful maternity care).
Ask the client to empty her bladder and explain why; assist her if necessary.
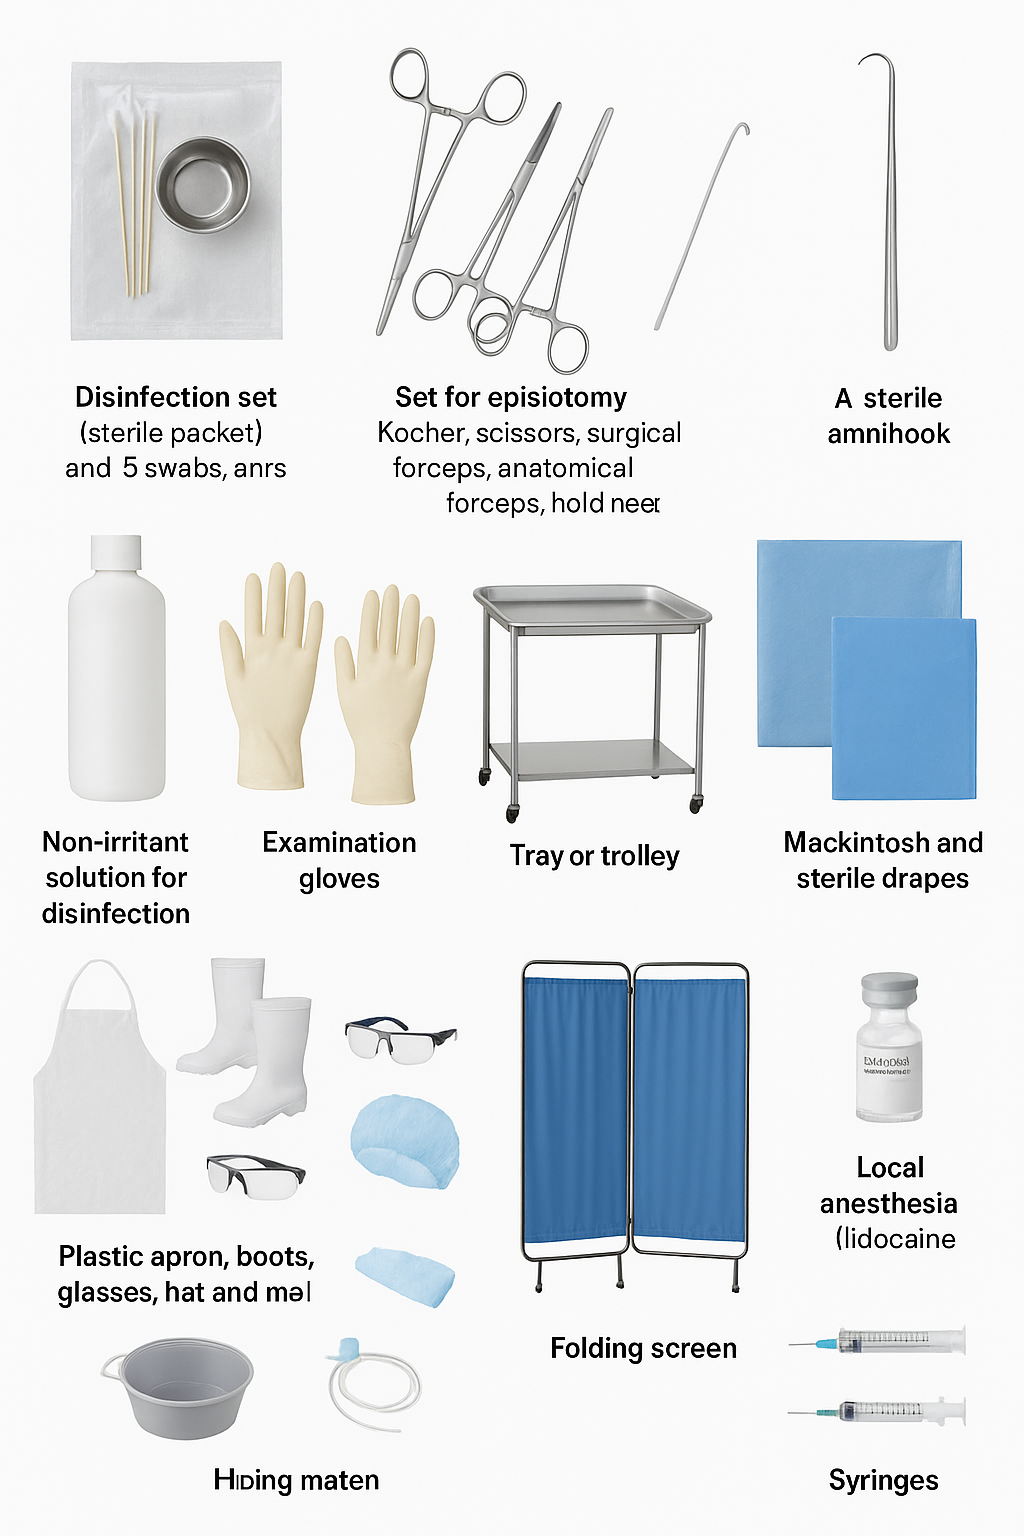
Equipment
• Disinfection set (sterile packet with a gall pot, five swabs, and Kocher forceps)
• Set for episiotomy (Kocher, scissors, surgical forceps, anatomical forceps, hold needle)
• 1 sterile amnihook in case of need.
• 1 sterile urinary catheter in case of need.
• Non-irritant solution for disinfection.
• Gloves (examination gloves, sterile gloves)
• Tray or trolley
• Mackintosh and sterile drapes
• Material of protection: plastic apron, boots, glasses, hat, and mask.
• A folding screen if no curtains are available.
• Bucket with a solution for decontamination.
• Local anesthesia (lidocaine 2%)
• Syringe of 10 mL and two needles.
• Syringe of 2 ml and 2 needles (1 for aspiration and 1 for IM injection)
• 1 ampoule of 10 IU oxytocin.
• Gauzes
• Fetoscope, Doppler
• Ensure the newborn resuscitation equipment is ready and working.
Check the following items:
Suction catheters
Aspirator machine
Oxygen
Ambu bags
Masks
Resuscitation table with an overhead heater.
• Material for taking vital signs.
• Container for placenta, dustbin.
• Bucket for decontamination with a solution of disinfection (chlorate solution 0.5%).
• Client records.
IMPLEMENTATION
Give her continuous emotional support and reassure her.
Choose the delivery position with the woman. Options include:
Squatted position
Knee position
Lateral position
Gynecological position with cushions or pillows for support.
Let the client push on her own after full dilation. This is best when the baby is well positioned in the pelvis.
Listen to the FHR after each contraction.
Make sure that the bladder is empty; if not, empty the bladder by inserting a urinary catheter.
Put on the materials for protection (plastic apron, boots, glasses, hat, and mask).
Wash and dry your hands.
Put on the examination gloves.
Clean the vulva and the perineum with five gauzes dipped in a solution of disinfection. Clean from the top to bottom, either with examination gloves or Kocher’s forceps.
Decontaminate examination gloves before discarding them in the dustbin.
Disinfect your hands with alcohol. If not, wash them well with soap and water. Then, dry them with a sterile towel from the table or let them air dry.
Slide the sterile drape under the woman's buttocks. Make sure not to touch her or the table.
Put on the sterile gloves that are on the table.
Take a folded sterile drape/tissue from the table and put it on the abdomen of the client to receive the baby.
Delivery of the head
Place one hand’s fingers on the advancing head. This keeps it flexed to help control the delivery.
Use the other hand to support the perineum with gauze.
Evaluate for episiotomy if necessary (see the checklist for the episiotomy procedure).
Maintain a firm but delicate pressure on the head to maintain its flexion.
Ask the client to blow with a soft force to avoid pushing in the absence of a contraction.
Once you deliver the head, use your hand to receive it.
Wipe the mouth and nose of the baby with sterile gauze and remove any mucus.
Verify that the cord is not around the baby’s neck: if the cord does not tighten, make it slip over the head of the baby. If the cord tightens, apply two Kocher forceps and cut the cord between the two clamps.
Allow the head to rotate in a natural manner.
Delivery of the shoulders
Place a hand on each side of the baby’s head over the ears.
Pull down with a light touch to assist the front shoulder in sliding under the pubic symphysis.
When you see the axillary crease, lift the head and trunk. This helps the posterior shoulder move over the perineum.
Hold the baby around the chest to help deliver the trunk. Then, lift the baby onto the client’s abdomen and cover the baby.
Memorize the hour and the date of birth.
Inform the client about the sex of the baby and congratulate her.
Wait 2 to 3 minutes before clamping the umbilical cord. Also, check the umbilical pulse first.
Apply Kocher’s forceps to the umbilical cord 20 cm from the baby’s abdomen. Then, place the second forceps 25 cm from the baby.
Cut the cord between the two Kocher's forceps. Use the baby scissors and a gauze. This will help stop blood from spurting.

COMPLETION
Put the material used in the bucket of decontamination solution.
Leave the area tidy.
Wash and dry hands
Teach immediate breastfeeding.
Check the umbilical cord for bleeding.
Keep the baby warm.
Discuss immunization.
Cover family planning.
Talk about nutrition.
Emphasize hygiene.
Explain danger signs for mothers and babies.
Document the findings obtained in her file using the partograph